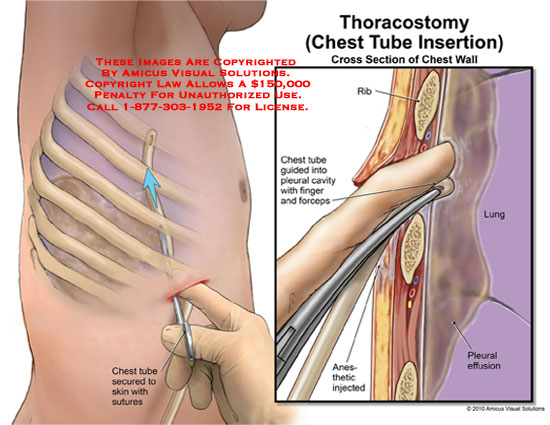
A chest tube insertion procedure is where you can place a flexible and hollow drainage tube into the chest in order to remove an abnormal collection of air or fluid from the pleural space. Chest tubes are used to treat all kinds of conditions that can cause a lung to collapse. Here is list of those three conditions:
- Surgery, trauma in the chest
- Pneumothorax, air leaking into the chest
- Pleural effusion causing bleeding into the chest, made of fatty fluid, abscess or pus buildup in the lung, chest, or even a heart failure
<< Back To Medical Nursing Videos
 How is the chest tube insertion procedure performed?
The point of chest tube insertion is on the lateral thorax side, from the anterior axillary line to the lower junction of the sternum, or chest bone in females and lateral side of the nipples in males. The skin is sterilized with an antiseptic solution and local anesthesia is administered to minimize the discomfort. The skin over the rib that is chosen for insertion is anesthetized with lidocain. Lidocain is a local chemical anesthetic agent; the technician is using a 10-cc syringe and 25-gauge needle. At the rib below the rib is chosen for pleural insertion, all the covered area such as: tissues, muscles, bone and lining covering are also anesthetized by using a 22-gauge needle.
The chest tube insertion must be sterile and for that matter all health- care providers will take percussions such as: sterile gown, facemask and eye protection. All equipment must be sterile and universal percussions are followed for blood and body fluids. The chest tube size selection depends on the problem; an 18-20F catheter is used for pneumothorax, a 32-26F catheter is used for hemothorax and if we have a trauma patient than usually it is used a 38-40F catheter size; for children the tube sizes are much smaller.
The patient’s arm is placed over the head with a restraint on the affected side. The patient’s head is elevated from the bed so there will be enough room for an insertion line down the armpit. The physician will take an anesthetic needle and syringe and gently insert the needle, aspirate into the pleural cavity to check if there is a presence of air or fluid. If there is no presence of air or fluid the physician will make an incision and he will use a clamp to open the pleural cavity. When the pleural cavity is opened, either air or fluid will rush out from it. The suction-drain system is attached and a silk suture is used to hold the tube firmly in place. The area is wrapped and the technician will take an x ray to visualize the status of the tube placement.
Diagnosis and preparation
The diagnosis for chest tube insertion depends on the primary cause or air in the pleural cavity. For malignancy, the diagnosis can be established with positive cytopathology and a chest x ray that shows fluid accumulation. The signs of empyema include:
- Fever
- Cough
- Sputum discharge
- Developed pleural effusion
With this type of lung infection the chest x ray can readily allow the clinician to view the pleural effusion, detect pneumothorax and the visual proof in the displacement of the tissues is covering the lugs as a result of air in the pleural cavity. For all complicated cases that may require chest tube insertion a computes axial tomography can be used for better visualization as well as to analyze them.
Risks
There are several complications like:
- injured intercostal artery that can cause internal bleeding
- The heart, arteries, or lung can be injured during the procedure that can be a result from the chest tube insertion
- A local or generalized infection
- Unexplained air leaks in the tube
What to do after the chest tube insertion procedure:
Breathe deeply and cough often. Breathing deeply and coughing can help you re-expand your lung, better drainage, and prevent fluids collection in your lungs.
Be more careful, there are no kinks in your tube. Do not move your drainage bottle; it has to be placed upright and below your lungs. If you move it, the fluid or air will not drain and your lugs cannot re-expand.


